원본은 NXP 사이트에서 바로 받을 수 있다.
Introduction to Device Trees - 1
Introduction to Device Trees - 2
Introduction to Device Trees - 4
Introduction to Device Trees - 5
Introduction to Device Trees - 6
Introduction to Device Trees - 7
4.1. Partitions
여러 번 플래시 파티션이 장치 트리에 설명되어 있습니다 (표 1 참조). 예를 들어 이것은 커널에서 볼 수 있는 mtd 장치의 파티션에 해당합니다. 그러나 파티션은 일반적으로 하드웨어 설명을 기반으로 하지 않으며, 대신 Device Tree 작성자가 임의의 파티션을 작성하므로 권장하지 않습니다.
5. Interrupts
인터럽트는 주소 변환과 다르며 트리의 특성 구조를 따르지 않습니다. 대신해서 인터럽트 신호는 기계의 어느 곳에서나 발생하여 종료 될 수 있습니다. 인터럽트 신호는 자연스럽게 트리 형태가 아닌 노드 간 링크로 표시됩니다. 인터럽트 연결은 다음 속성을 사용하여 설명 할 수 있습니다.
- interrupt-controller
- #interrupt-cells
- interrupt-parent
- interrupts
interrput-controller 속성은 빈 속성으로, 노드를 인터럽트 신호를 받는 장치로 선언합니다.
#interrupt-cells 속성은 인터럽트 컨트롤러 노드의 속성입니다. 인터럽트 컨트롤러의 인터럽트 지정자에 몇 개의 셀이 있는지 정의하는 데 사용됩니다.
interrput-parent 속성은 연결된 인터럽트 컨트롤러에 대한 phandle을 포함하는 장치 노드의 속성입니다. interrupt-parent 속성이 없는 노드는 부모 노드에서 속성을 상속할 수 있습니다.
마지막으로, interrputs 속성은 인터럽트 지정자 목록을 포함하는 장치 노드의 속성입니다. (각 인터럽트 출력 신호 당 하나씩)
다음 두 개의 노드는 QorIQ P1010 장치에서 인터럽트 연결을 보여 준다.
mpic: pic@40000 {
	interrupt-controller;
	#address-cells = <0>;
	#interrupt-cells = <4>;
	reg = <0x40000 0x40000>;
	compatible = "fsl,mpic";
	device_type = "open-pic";
};
serial0: serial@4500 {
	cell-index = <0>;
	device_type = "serial";
	compatible = “fsl,ns16550”,"ns16550";
	reg = <0x4500 0x100>;
	clock-frequency = <0>;
	interrupts = <42 2 0 0>;
	interrupt-parent = <&mpic>;
};
interrupt controller는 pic로 정의되며, 주소 오프셋 0x4_0000에 있습니다. mpic 레이블이 interrupt controller 노드의 interrupt-parent 속성에 phandle을 지정되어서 추가됩니다.
MPIC의 경우, interrput 속성에는 2 개 또는 4 개의 값이 있습니다. 첫 번째 셀은 항상 해당 인터럽트의 xIVPR 레지스터 색인을 지정합니다. 처음 16 개는 외부 인터럽트입니다. 나머지는 내부 인터럽트입니다. 따라서 내부 인터럽트의 값은 참조 설명서에 설명된 것보다 16보다 큽니다. pic 노드의 #interrupt-cells는 4로 정의되고 각 인터럽트 지정자는 4개의 셀을 나타냅니다. 위의 예에서 인터럽트 번호는 42입니다. 42 -16 = 26. P1010 참조 설명서에 따르면 DUART 인터럽트에 해당합니다.
두번째 값은 level sense를 표시합니다. MPIC의 경우 level sense는 아래와 같이 정의되어 있습니다.
- 0 = low-to-high edge sensitive type enabled
- 1 = active-low level sensitive type enabled
- 2 = active-high level sensitive type enabled
- 3 = high-to-low edge sensitive type enabled
만약에 세번째와 네번째 값이 있다면, 각각 interrupt-type과 type-info를 표시합니다. MPIC의 경우는 interrupt-type의 값을 아래와 같이 정의하고 있습니다.
- 0 = normal
- 1 = error interrupt
- 2 = MPIC inter-processor interrupt
- 3 = MPIC timer interrupt
오류 인터럽트가 발생한 경우, type-info는 오류 인터럽트 번호입니다. type-info는 IPI 및 타이머에도 유효합니다. MPIC 바인딩에 대한 자세한 설명은 Documentation / devicetree / bindings / powerpc / fsl / mpic.txt에 있습니다.
NOTE
device_type은 더 이상 사용되지 않으며 사용해서는 안됩니다. 또한 #cell-index를 사용하지 않는 것이 좋습니다. 만일 사용되는 경우에는 바인딩은 프로그래밍 모델에서 해당하는 내용에 대해, 보다 구체적으로 명명된 속성을 고려해야합니다.
ARM GIC의 경우에는 바인딩은 비슷하나 다릅니다. 첫번째 셀은 interrput type을 정의 합니다.
- 0 = SPI interrupts
- 1 = PPI interrupts
두번째 셀은 interrupt number를 포함합니다. SPI interrupt number는 0 - 987이며, 반면에 PPI interrput number는 0 - 15 입니다.
세번째 셀은 level sense를 표현합니다.
- 1 = low-to-high edge sensitive
- 2 = high-to-low edge sensitive
- 4 = active-high level sensitive
- 8 = active-low level-sensitive
GIC 바인딩에 대한 자세한 설명은 Documentation / devicetree / bindings / arm / gic.txt에 있습니다.
대체 인터럽트 컨트롤러의 경우, 두 셀에 대한 전체 설명을 보려면 특정 바인딩을 검사해야 하지만 일반적으로 첫 번째 셀 지정 인터럽트 번호와 두 번째 지정 인터럽트 플래그 (such as edge/level triggering, active-high, active-low, and so on).
6. Example: Device tree node
아래는 I2C 에 2개의 장치가 연결된 I2C 콘트롤러 노드의 예제이다.
i2c@3000 {
	#address-cells = <1>;
	#size-cells = <0>;
	cell-index = <0>;
	compatible = "fsl-i2c";
	reg = <0x3000 0x100>;
	interrupts = <43 2>;
	interrupt-parent = <&mpic>;
	dfsrr;
	dtt@48 {
		compatible = "national,lm75";
		reg = <0x48>;
	};
	rtc@68 {
		compatible = "dallas,ds1337";
		reg = <0x68>;
	};
};
위에서 설명한 구문을 사용하여, 이 예제 노드에 대해 다음과 같은 정보를 얻을 수 있습니다.
- I2C 컨트롤러는 부모노드로 부터 offset 0x3000
- I2C 컨트롤러의 드라이버는 “fsl-i2c”
- 첫번째 자식노드의 이름은 dtt 이고, 부모 노드로 부터(I2C 컨트롤러) offset은 0x48, 드라이버는 “national lm75”
- 두번째 자식노드의 이름은 rtc 이고, 부모 노드로 부터(I2C 컨트롤러) offset은 0x68, 드라이버는 “dallas ds1337”
- interrupt parent = mpic, interrupt number = 43. 이것은 OpenPIC이기 때문에 내부 interrupt를 위해서 16이 더해진 상황입니다. 따라서 실제적인 SoC interrupt number는 43 - 16 = 27 입니다.
7. Device tree inclusion
Device Tree는 여러 개의 파일로 나눌수가 있습니다. 아래 예제는 QorIQ Qonverge 제품의 Device Tree 입니다. BSC9131은 2개의 파일로 나누어져 있습니다.
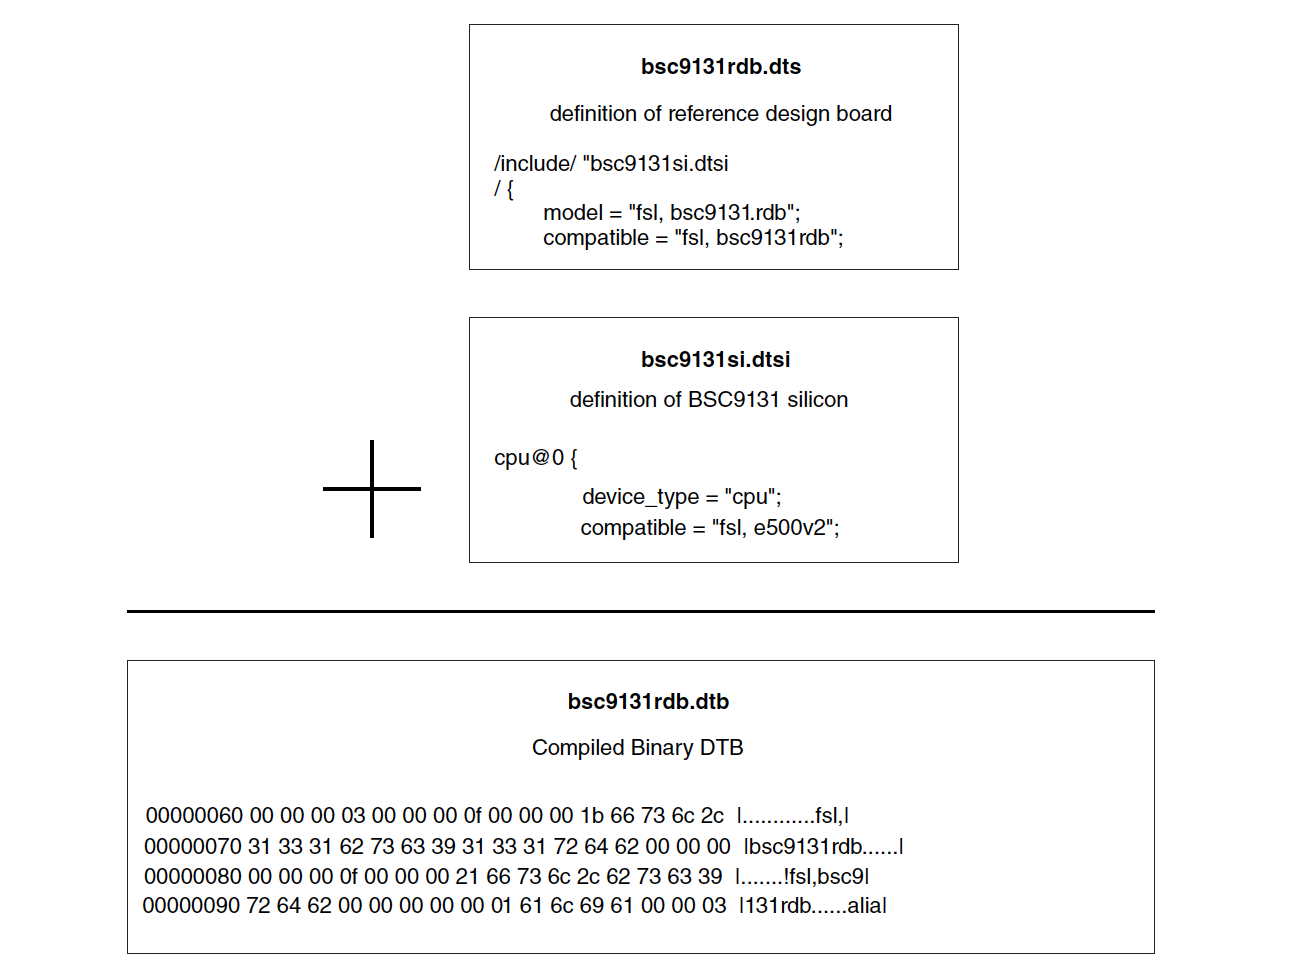
.dts 파일은 보드 수준 정의입니다. .dts 확장자는 “device tree source”를 나타냅니다.
.dtsi 파일은 .dts 파일에 포함된 파일이며, 일반적으로 SoC 수준 정의를 포함합니다. Device Tree 파일은 모놀리식일 필요는 없습니다. 대신 서로를 포함하여 여러 파일로 분할할 수 있습니다. 일반적으로 .dtsi 파일은 SoC 레벨 정보 정의가 포함된 파일이며, 반면에 .dts 파일은 보드 레벨 정보가 포함된 최종 디바이스 트리입니다.
.dtsi 확장자는 “device tree source include”을 나타냅니다.
이미 포함 파일된 트리 정보 위에, 포함될 파일의 트리를 오버레이하여 결합된 정보를 컴파일하여 이진 파일을 생성하면서 포함이 작동합니다.
다른 예로, P1022 프로세서는 다른 SoC 지정 노드들이 있는 다수의 포함 파일을 사용합니다.
- p1022ds.dtsi — board definitions common to all addresses sizes
- p1022ds_32b.dts — main 32-bit DTS for the P1022 development system
- p1022ds_36b.dts — main 36-bit DTS for the P1022 development system
- fsl/p1022si-pre.dtsi — aliases and CPU nodes
- fsl/p1022si-post.dtsi — updates/overrides to SoC-specific nodes
- fsl/pq3-*.dtsi — common PowerQUICC III SoC devices
- fsl/qoriq-*.dtsi — common QorIQ SoC devices
/include/ "pq3-i2c-0.dtsi“
/include/ "pq3-i2c-1.dtsi“
/include/ "pq3-duart-0.dtsi“
/include/ "pq3-espi-0.dtsi“
spi@7000 {
	fsl,espi-num-chipselects = <4>;
};